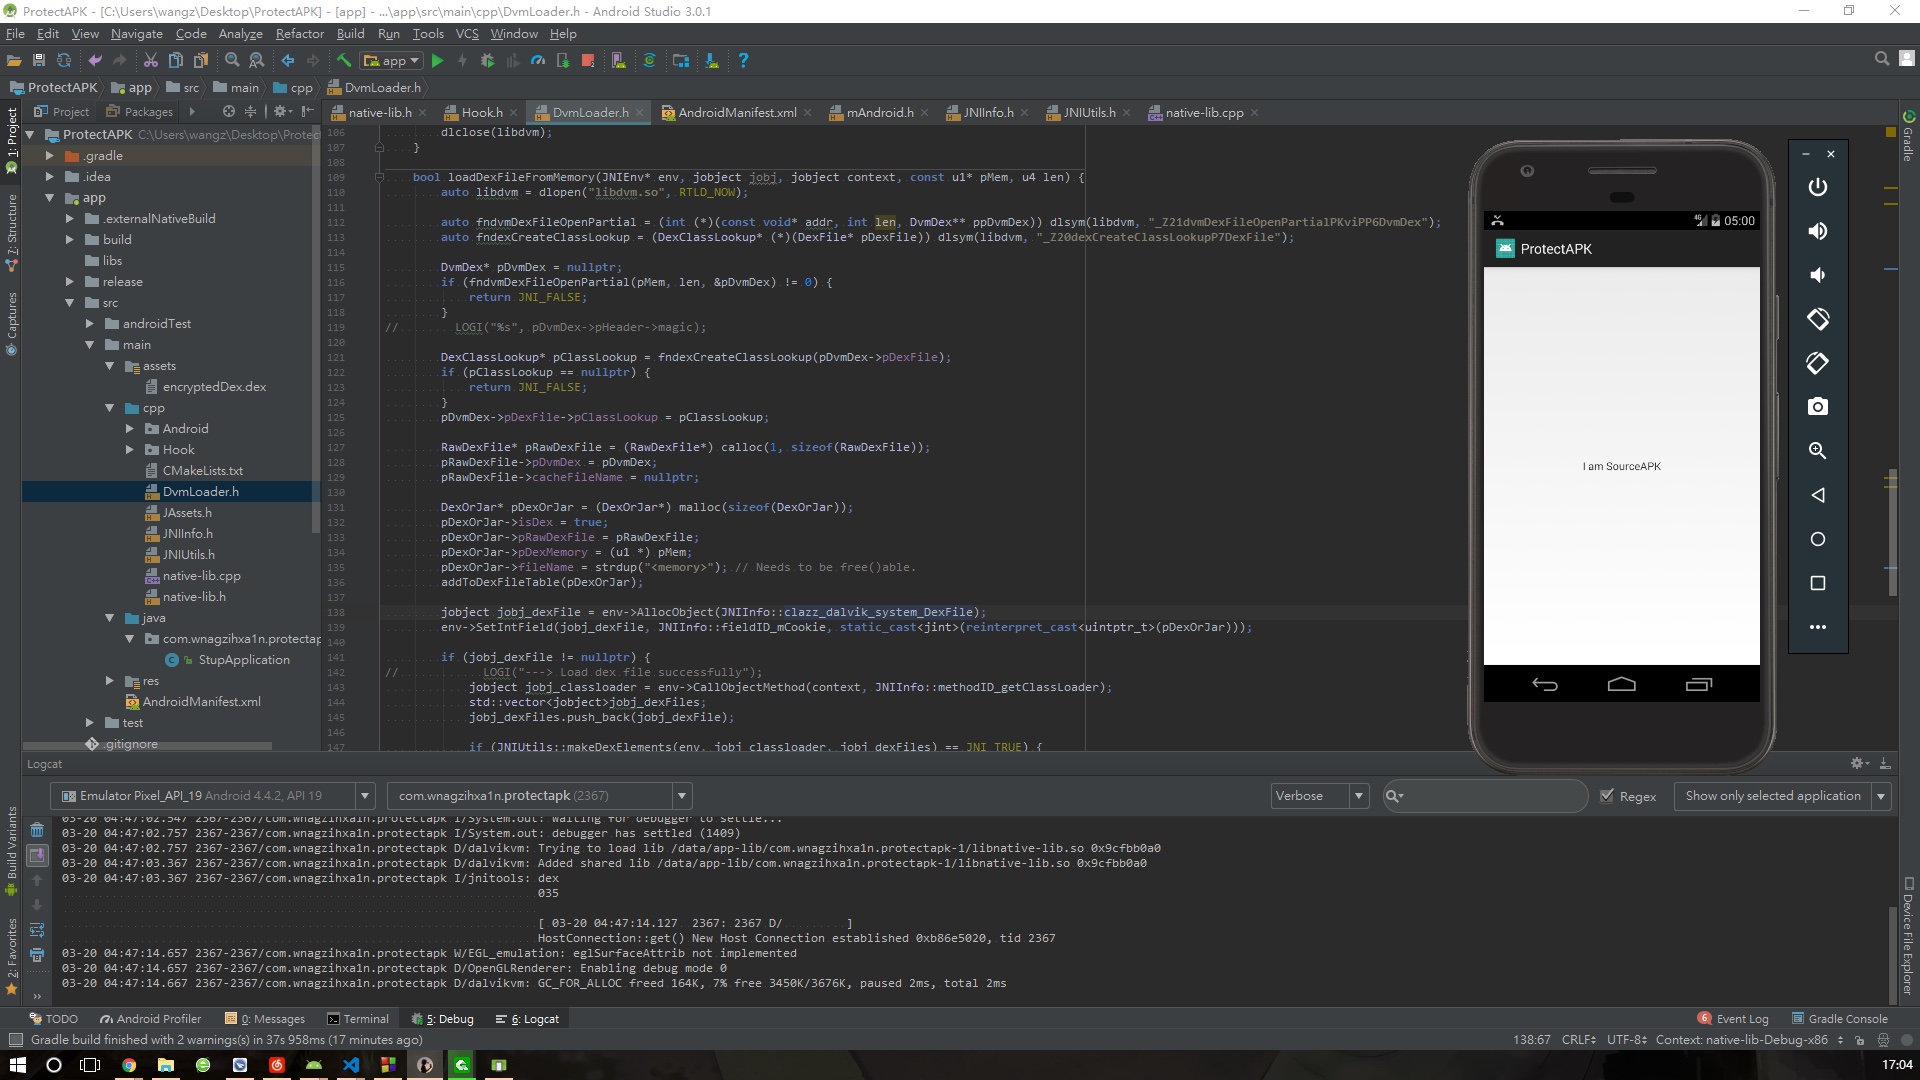
之前的文章中,我们实现了在Native层中加载Dex文件,但是有个问题在于,解密后的Dex文件有那么一小段时间是写出到文件里的
写出的Dex文件通过调用Native层的函数进行加载,那么所调用的函数也是要先读取,再接着调用某函数进行Dex的加载,所以我们可以直接把解密后的Dex数据存在内存中,直接调用libdvm.so中的相关函数进行Dex加载即可
先来看Dex文件在Native层的读取加载过程,我们通过调用Native层的函数进行了文件的加载,这个函数使用的是匹配签名和Java层函数名获取,在Native层命名为Dalvik_dalvik_system_DexFile_openDexFileNative()
auto libdvm = dlopen("libdvm.so", RTLD_NOW);
auto dvm_dalvik_system_DexFile = (JNINativeMethod *) dlsym(libdvm, "dvm_dalvik_system_DexFile");
void (*fnOpenDexFileNative)(const u4* args, JValue* pResult) = nullptr;
for (auto p = dvm_dalvik_system_DexFile; p->fnPtr != nullptr; p++) {
    if (strcmp(p->name, "openDexFileNative") == 0
        && strcmp(p->signature, "(Ljava/lang/String;Ljava/lang/String;I)I") == 0) {
        fnOpenDexFileNative = (void (*)(const u4 *, JValue *)) p->fnPtr;
        break;
    }
}

DexOrJar* pDexOrJar = nullptr;
if (fnOpenDexFileNative != nullptr) {
    LOGI("Found fnOpenDexFileNative");
    auto fndvmCreateStringFromCstr = (void* (*)(const char* utf8Str)) dlsym(libdvm, "_Z23dvmCreateStringFromCstrPKc");
    u4 args[2];
    args[0] = static_cast<u4>(reinterpret_cast<uintptr_t>(fndvmCreateStringFromCstr(cachefilePath.c_str())));
    args[1] = static_cast<u4>(reinterpret_cast<uintptr_t>(fndvmCreateStringFromCstr(cachefileOpt.c_str())));
    JValue result;
    fnOpenDexFileNative(args, &result);
    pDexOrJar = (DexOrJar*) result.l;
}
而函数Dalvik_dalvik_system_DexFile_openDexFileNative()有一个双胞胎弟弟Dalvik_dalvik_system_DexFile_openDexFileNative(),我们看其定义,传入的参数为字节数组,也就是说,这个函数也是用于加载Dex的,功能和上面那个函数一样,只是它传入的参数是字节数组
{ "openDexFile", "([B)I", Dalvik_dalvik_system_DexFile_openDexFile_bytearray }
如果说可以用Java层来操作文件,那么我们只需要在Java层解密Dex文件,然后直接调用这个函数进行Dex的加载,这就可以做到不落地了
但是这里并不能使用Java层的函数
我们可以换一种思路,既然传进来的是字节数组,那就说明后面也是将字节数组转为C++的数组类型或者其它文件流等Native层可以处理的数据
我们只需要摸清这个函数接下来的操作,模拟一下不就好了吗?
而且代码都是现成的,有些函数还可以通过dlopen和dlsym进行调用,所以现在的任务就是分析一下这个函数都做了哪些操作
第一个函数是Dalvik_dalvik_system_DexFile_openDexFile_bytearray(),通过拷贝操作把字节数组的数据赋值给pBytes,然后传入dvmRawDexFileOpenArray(),然后是一些pDexOrJar指向的结构体成员赋值操作,最后返回pDexOrJar指针
static void Dalvik_dalvik_system_DexFile_openDexFile_bytearray(const u4* args,
    JValue* pResult)
{
    ArrayObject* fileContentsObj = (ArrayObject*) args[0];
    u4 length;
    u1* pBytes;
    RawDexFile* pRawDexFile;
    DexOrJar* pDexOrJar = NULL;

    if (fileContentsObj == NULL) {
        dvmThrowNullPointerException("fileContents == null");
        RETURN_VOID();
    }

    /* TODO: Avoid making a copy of the array. (note array *is* modified) */
    length = fileContentsObj->length;
    pBytes = (u1*) malloc(length);

    if (pBytes == NULL) {
        dvmThrowRuntimeException("unable to allocate DEX memory");
        RETURN_VOID();
    }

    memcpy(pBytes, fileContentsObj->contents, length);

    if (dvmRawDexFileOpenArray(pBytes, length, &pRawDexFile) != 0) {
        ALOGV("Unable to open in-memory DEX file");
        free(pBytes);
        dvmThrowRuntimeException("unable to open in-memory DEX file");
        RETURN_VOID();
    }

    ALOGV("Opening in-memory DEX");
    pDexOrJar = (DexOrJar*) malloc(sizeof(DexOrJar));
    pDexOrJar->isDex = true;
    pDexOrJar->pRawDexFile = pRawDexFile;
    pDexOrJar->pDexMemory = pBytes;
    pDexOrJar->fileName = strdup("<memory>"); // Needs to be free()able.
    addToDexFileTable(pDexOrJar);

    RETURN_PTR(pDexOrJar);
}
跟入dvmRawDexFileOpenArray()函数,调用了一个dvmPrepareDexInMemory()函数,该函数作用是给pDvmDex指向的结构体赋值,然后处理后的结构体作为一个成员赋值给(*ppRawDexFile)->pDvmDex
int dvmRawDexFileOpenArray(u1* pBytes, u4 length, RawDexFile** ppRawDexFile)
{
    DvmDex* pDvmDex = NULL;

    if (!dvmPrepareDexInMemory(pBytes, length, &pDvmDex)) {
        ALOGD("Unable to open raw DEX from array");
        return -1;
    }
    assert(pDvmDex != NULL);

    *ppRawDexFile = (RawDexFile*) calloc(1, sizeof(RawDexFile));
    (*ppRawDexFile)->pDvmDex = pDvmDex;

    return 0;
}
跟入dvmPrepareDexInMemory(),调用了一个rewriteDex()函数
bool dvmPrepareDexInMemory(u1* addr, size_t len, DvmDex** ppDvmDex)
{
    DexClassLookup* pClassLookup = NULL;

    if (!rewriteDex(addr, len, false, false, &pClassLookup, ppDvmDex)) {
        return false;
    }

    (*ppDvmDex)->pDexFile->pClassLookup = pClassLookup;

    return true;
}
跟入rewriteDex(),这里就是关键的地方了,一共有两个关键的函数调用,第一个是dvmDexFileOpenPartial(),第二个是dexCreateClassLookup()
static bool rewriteDex(u1* addr, int len, bool doVerify, bool doOpt,
    DexClassLookup** ppClassLookup, DvmDex** ppDvmDex)
{
    DexClassLookup* pClassLookup = NULL;
    u8 prepWhen, loadWhen, verifyOptWhen;
    DvmDex* pDvmDex = NULL;
    bool result = false;
    const char* msgStr = "???";

    if (dexSwapAndVerify(addr, len) != 0)
        goto bail;

    if (dvmDexFileOpenPartial(addr, len, &pDvmDex) != 0) {
        ALOGE("Unable to create DexFile");
        goto bail;
    }

    pClassLookup = dexCreateClassLookup(pDvmDex->pDexFile);
    if (pClassLookup == NULL)
        goto bail;
    pDvmDex->pDexFile->pClassLookup = pClassLookup;

    if (!doVerify && !doOpt) {
        result = true;
        goto bail;
    }

    prepWhen = dvmGetRelativeTimeUsec();

    if (!loadAllClasses(pDvmDex))
        goto bail;
    loadWhen = dvmGetRelativeTimeUsec();

    if (!dvmCreateInlineSubsTable())
        goto bail;

    verifyAndOptimizeClasses(pDvmDex->pDexFile, doVerify, doOpt);
    verifyOptWhen = dvmGetRelativeTimeUsec();

    if (doVerify && doOpt)
        msgStr = "verify+opt";
    else if (doVerify)
        msgStr = "verify";
    else if (doOpt)
        msgStr = "opt";
    ALOGD("DexOpt: load %dms, %s %dms, %d bytes",
        (int) (loadWhen - prepWhen) / 1000,
        msgStr,
        (int) (verifyOptWhen - loadWhen) / 1000,
        gDvm.pBootLoaderAlloc->curOffset);

    result = true;

bail:
    failed;

    return result;
}
所以我们只需要通过dlopen()和dlsym()来调用这两个函数,完成结构体的赋值即可,根据源码对照着写就行
auto libdvm = dlopen("libdvm.so", RTLD_NOW);
auto fndvmDexFileOpenPartial = (int (*)(const void* addr, int len, DvmDex** ppDvmDex)) dlsym(libdvm, "_Z21dvmDexFileOpenPartialPKviPP6DvmDex");
auto fndexCreateClassLookup = (DexClassLookup* (*)(DexFile* pDexFile)) dlsym(libdvm, "_Z20dexCreateClassLookupP7DexFile");

DvmDex* pDvmDex = nullptr;
if (fndvmDexFileOpenPartial(pMem, len, &pDvmDex) != 0) {
    return JNI_FALSE;
}

DexClassLookup* pClassLookup = fndexCreateClassLookup(pDvmDex->pDexFile);
if (pClassLookup == nullptr) {
    return JNI_FALSE;
}
pDvmDex->pDexFile->pClassLookup = pClassLookup;

RawDexFile* pRawDexFile = (RawDexFile*) calloc(1, sizeof(RawDexFile));
pRawDexFile->pDvmDex = pDvmDex;
pRawDexFile->cacheFileName = nullptr;

DexOrJar* pDexOrJar = (DexOrJar*) malloc(sizeof(DexOrJar));
pDexOrJar->isDex = true;
pDexOrJar->pRawDexFile = pRawDexFile;
pDexOrJar->pDexMemory = (u1 *) pMem;
pDexOrJar->fileName = strdup("<memory>"); // Needs to be free()able.
addToDexFileTable(pDexOrJar);
我们观察到最后有一个addToDexFileTable()函数,这个函数是将pDexOrJar指针加入一个全局Dex指针表,不过这个函数是在IDA里并没有搜到,所以我们只能手动实现它
static void addToDexFileTable(DexOrJar* pDexOrJar) {
    u4 hash = (u4) pDexOrJar;
    void* result;

    dvmHashTableLock(gDvm.userDexFiles);
    result = dvmHashTableLookup(gDvm.userDexFiles, hash, pDexOrJar,
            hashcmpDexOrJar, true);
    dvmHashTableUnlock(gDvm.userDexFiles);

    if (result != pDexOrJar) {
        ALOGE("Pointer has already been added?");
        dvmAbort();
    }

    pDexOrJar->okayToFree = true;
}
有三个方法是需要使用dlopen()和dlsym()来调用
auto libdvm = dlopen("libdvm.so", RTLD_NOW);
auto fndvmHashTableLock = (void (*)(HashTable* pHashTable)) dlsym(libdvm, "_Z16dvmHashTableLockP9HashTable");
auto fndvmHashTableUnlock = (void (*)(HashTable* pHashTable)) dlsym(libdvm, "_Z18dvmHashTableUnlockP9HashTable");
auto fndvmHashTableLookup = (void* (*)(HashTable* pHashTable, u4 itemHash, void* item, HashCompareFunc cmpFunc, bool doAdd)) dlsym(libdvm, "_Z18dvmHashTableLookupP9HashTablejPvPFiPKvS3_Eb");
好几个参数都是需要单独加进去的
static int hashcmpDexOrJar(const void* tableVal, const void* newVal)
{
    return (int) newVal - (int) tableVal;
}

struct HashEntry {
    u4 hashValue;
    void* data;
};

typedef void (*HashFreeFunc)(void* ptr);
typedef int (*HashCompareFunc)(const void* tableItem, const void* looseItem);

struct HashTable {
    int         tableSize;          /* must be power of 2 */
    int         numEntries;         /* current #of "live" entries */
    int         numDeadEntries;     /* current #of tombstone entries */
    HashEntry*  pEntries;           /* array on heap */
    HashFreeFunc freeFunc;
    pthread_mutex_t lock;
};
最后剩一个gDvm对象,这里的获取方式就比较巧妙了
我们首先来看定义,这是一个全局变量
struct DvmGlobals gDvm;
来看DvmGlobals结构体,非常大,其中的gDvm.userDexFiles是一个HashTable*类型的数据
truct DvmGlobals {
    char*       bootClassPathStr;
    char*       classPathStr;

    ...

    HashTable*  userDexFiles;

    ...
然后通过调用dvmInternalNativeShutdown()函数进行获取,为了避免出问题,我们使用Hook的方式,然后获取到数据后就取消Hook
void dvmInternalNativeShutdown()
{
    dvmHashTableFree(gDvm.userDexFiles);
}
这里可以直接使用GOT Hook的方式,大概的过程就是先找到打开/proc/self/maps,找到libdvm.so的加载内存段,定位好并解析数据,找到GOT表所在内存,进行遍历,找到存储dvmHashTableFree()函数指针的地址,然后找到我们的壳so加载的基址以及替换的函数指针,进行相加得到真正替换后的函数内存地址,写到之前找到的GOT表原函数地址,即可进行GOT表Hook
Hook::hookMethod(libdvm, "_Z16dvmHashTableFreeP9HashTable", (void*) newfndvmHashTableFree, (void**)&olddvmHashTableFree);
fndvmInternalNativeShutdown();
我们可以通过一个简单的字段来控制是否Hook,因为我们Hook一次就行
static void (*olddvmHashTableFree)(HashTable* pHashTable);

HashTable *userDexFiles = nullptr;
static void newfndvmHashTableFree(HashTable* pHashTable) {
    if (JNIInfo::isHook) {
        userDexFiles = pHashTable;
        JNIInfo::isHook = false;
        return;
    } else {
        return olddvmHashTableFree(pHashTable);
    }
}
最后设置mCookie即可
jobject jobj_dexFile = env->AllocObject(JNIInfo::clazz_dalvik_system_DexFile);
env->SetIntField(jobj_dexFile, JNIInfo::fieldID_mCookie, static_cast<jint>(reinterpret_cast<uintptr_t>(pDexOrJar)));

if (jobj_dexFile != nullptr) {
    jobject jobj_classloader = env->CallObjectMethod(context, JNIInfo::methodID_getClassLoader);
    std::vector<jobject>jobj_dexFiles;
    jobj_dexFiles.push_back(jobj_dexFile);

    if (JNIUtils::makeDexElements(env, jobj_classloader, jobj_dexFiles) == JNI_TRUE) {
        dlclose(libdvm);
        return JNI_TRUE;
    } else {
        return JNI_FALSE;
    }
} else {
    return JNI_FALSE;
}
return JNI_FALSE;
跑起来

效果还是可以的
